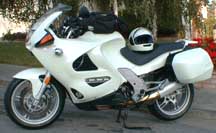
BMW
K1200RS
Fairing Removal and Installation Tips
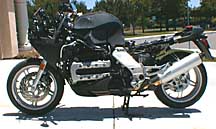
 If you're a Do-It-Yourselfer you won't have your K1200RS long before
you get your first "opportunity" to remove and install the expansive fairing.
Changing the oil requires dropping the lower cowling, while air and fuel filter
changes mean removing the seat, turn signal pods, and side panels as well. More
adventurous owners will also experience the joys of front panel and side cover
removal. Most of these components are held on with 5mm x .8 socket head cap
screws of various lengths which number in the neighborhood of 35 fasteners.
Fortunately all use a 3mm hex key, and none are installed with much torque. Two
things are indispensable in dealing with this screwy situation: Patience and a
pair of ball end allen drivers.
If you're a Do-It-Yourselfer you won't have your K1200RS long before
you get your first "opportunity" to remove and install the expansive fairing.
Changing the oil requires dropping the lower cowling, while air and fuel filter
changes mean removing the seat, turn signal pods, and side panels as well. More
adventurous owners will also experience the joys of front panel and side cover
removal. Most of these components are held on with 5mm x .8 socket head cap
screws of various lengths which number in the neighborhood of 35 fasteners.
Fortunately all use a 3mm hex key, and none are installed with much torque. Two
things are indispensable in dealing with this screwy situation: Patience and a
pair of ball end allen drivers.
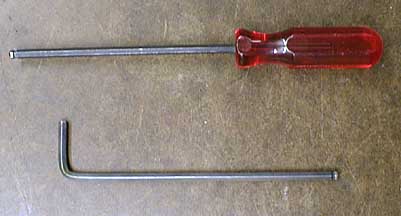
 The short end of the traditional bent wrench comes in handy when a
little extra torque is needed, while the ball end on either tool will speed
screw removal by allowing the wrench to be offset from the screw axis by several
degrees while turning. The screwdriver handle tool is the fastest and provides
about the right amount of leverage for tightening the fairing screws. Careful
with that ax, Eugene!
The short end of the traditional bent wrench comes in handy when a
little extra torque is needed, while the ball end on either tool will speed
screw removal by allowing the wrench to be offset from the screw axis by several
degrees while turning. The screwdriver handle tool is the fastest and provides
about the right amount of leverage for tightening the fairing screws. Careful
with that ax, Eugene!
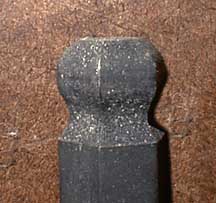
 The
material from which these screws are made appears to be some form of exotic
cheese. This conclusion was arrived at by observing that the hex shaped drive
socket becomes a round hole after only a few extract/remove cycles. The black
finish is similar to cheese rind, in that it is easily worn through and
unsightly. This being the case it's a good idea to pick up a few spares when you
visit the dealer. By the way, the nylon washers under the screw heads sold
separately, so it wouldn't hurt to snag a few of these, too.
The
material from which these screws are made appears to be some form of exotic
cheese. This conclusion was arrived at by observing that the hex shaped drive
socket becomes a round hole after only a few extract/remove cycles. The black
finish is similar to cheese rind, in that it is easily worn through and
unsightly. This being the case it's a good idea to pick up a few spares when you
visit the dealer. By the way, the nylon washers under the screw heads sold
separately, so it wouldn't hurt to snag a few of these, too.


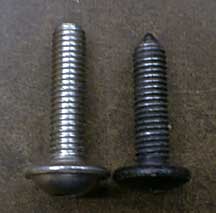 You might want to avoid the problem all together by using a substitute
screw from the F650, shown on the left in the photo. That part number is 46 63 2
346 171 (thanks, Sachi!). It is stainless steel and about the same length as the
long screw shown for comparison. The head is shaped a bit different, but it uses
the same 3mm allen key. You'll have to be the judge if the silver color is
suitable for your machine.
You might want to avoid the problem all together by using a substitute
screw from the F650, shown on the left in the photo. That part number is 46 63 2
346 171 (thanks, Sachi!). It is stainless steel and about the same length as the
long screw shown for comparison. The head is shaped a bit different, but it uses
the same 3mm allen key. You'll have to be the judge if the silver color is
suitable for your machine.
With so many screws its easy to lose track of what size came from what
hole, and keep them sorted is a PITA anyway. The photo at right shows the three
types of fairing screw. The trick in putting the screws in the right place is in
understanding why they have different lengths. The shortest screw passes through
only one layer of plastic and threads into an aluminum frame casting which is
very strong. The middle screw threads into a body clip, so it has to pass
through two layers of metal or plastic to get to the threads. You'll find one of
these on the underside of the side cover. The long screw also threads into a
body clip, but it passes through three layers of metal or plastic. An example of
this is the forward side panel screw located under the seat. It passes through
the side cover, the side panel, and the frame rail tab before reaching the
threads. When you are doing the reassembly, just count how many layers the screw
passes through before it gets to the threads and pick the appropriate
screw.
One last tip before we get goin'. Use a discarded spray paint can cap to hold the screws and other small components as you remove them from the fairing. You can segregate the screws by what part or assembly they came off of by using several caps, then storing the part and the cap together.
Still with me? OK! Lets pop a fairing!
|
|
|