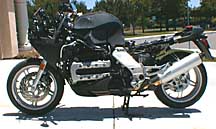
Fairing Installation Tips
Text In the BMW repair manual you're given sketchy disassembly instructions and often no more than "Install in the reverse order of work" as an aid for reassembly. There are a few tips that will help get the fairing back on, and I've listed them here in the order you're likely to need them.
Use the Right Screw:
There's only one
right screw for every location on the fairing. Check the
introduction
for tips on getting the proper screw in the right location.
Sidecovers:
Reinstall the sidecovers by
engaging the hole in the leading edge on the grommet, then hooking the lower
rear edge under the frame rail. Flex the upper rear edge of the sidecover up and
over the frame rail until the mounting tab aligns with the hole.
Side Panels:
Start by holding the panel
vertical with a hand on the rear edge and another low around the leading edge.
Position the top forward portion under the instrument cluster with the rear of
the fairing held up to clear the center panel on the fuel cell. Make sure the
portion of the fairing at the rear of the fork well goes over the mounting tab
on the lower front edge of the fuel cell center panel as you lower the rear edge
of the panel. Engage the fingers into the center panel edge, then wiggle the
panel until you feel the stud align with the rubber grommet at the lower rear
edge. Help the lower portion slide past the aluminum engine mount by flexing it
slightly outward and downward. Push firmly directly over the grommet to seat the
stud. Find the short screw with the flat end and install it in the lowest
fairing tab.
Lower Cowl:
Position the cowl under the
engine and have the two large mounting screws handy. Lay on the left side of the
bike so you can see between the cowl and the mounting bracket, and lift the cowl
up. Put the right side screw (with washers in place) through the hole and guide
it into the mount. Give it a turn or two to hold it in and repeat with the left
side screw. Leave the screws very loose for now. Spring the side panels out so
the lip on the cowl slides under the lower edge of the side panels. Start at the
forward right side of the cowl and install the mounting screw. Then install its
mate on the left side. Install the screw on the top left front surface of the
cowl next. Finish up with the three screws on each side panel lower edge. When
all the screws are started tighten them working from back to front in a "U"
pattern to make sure you don't miss any, especially the one on the top front
surface of the cowl.
Seat:
A lot of folks have trouble
replacing the seat, especially when using the upper position. Try experimenting
with the fairing and sidecovers removed so you can see how the parts are fitting
together. Put the seat on from the rear so that the tongue at the front slides
under the mounting bar. Lift the front of the seat until you feel the tongue
contact the underside of the mounting bar. Lower the rear of the seat down until
it hits the latch and while still holding up on the front of the seat, force the
rear down and forward to engage the latch. If you're using the lower position,
just drop the front of the seat onto the frame rails, slide it forward until you
feel the rear bar engage the latch, and push down and forward to
lock.
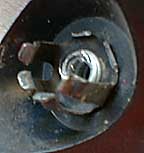 Turn Signal Pods:
The pods require the utmost in care and
precision to remount without damage. If the steel fingers are not positioned
exactly over the bayonets they will break when the pod is driven home. Connect
the turn signal lead to the socket and slide the wire under the locating tab.
Align the lower two bayonets with their respective finger sockets, then rotate
the pod upward to align the top bayonet. Verify that the tab on the fairing
enters the grommet in the pod as it rotates upward. Use a flashlight to visually
verify alignment of all three sockets before proceeding. When all three are
aligned, use the heel of your hand to strike the outer edge of the pod and drive
the sockets over the bayonets. Use the flashlight to verify that all three
sockets are fully engaged.
|
|
|